INSULATION
Eric Clark. Area 17.
During the heat of summer (Don`t look so blank) the word insulation has little impact on the average person in their darkroom but when the colder damp months arrive and some of us are faced with perhaps some form of condensation together with difficulties in maintaining the temperatures of solutions, film tanks, washing water etc. and even air temperature we either put things off, or struggle and vow to do something before next time. Certainly a bit of comfort goes down better as we grow older as does everything that makes life easier.
My darkroom is situated at the end of my concrete block built workshop and was built originally of timber frame on two sides which were covered with hardboard, the other two sides being concrete rendered walls. Eventually I decided to have a blitz and insulate. Soon after starting I was forced to stop for a fairly long period due to health problems and subsequent retirement. The work was carried out by constructing a system of secondary battens which were covered by «" fibreboard bought in 8" x 4" sheets which, when fixed were given a couple of coats of white emulsion paint. Just above the work surfaces I stuck pieces of off-cut formica on the walls about 14"-15" high to take the knocks from tanks etc. All this made a great difference in general.
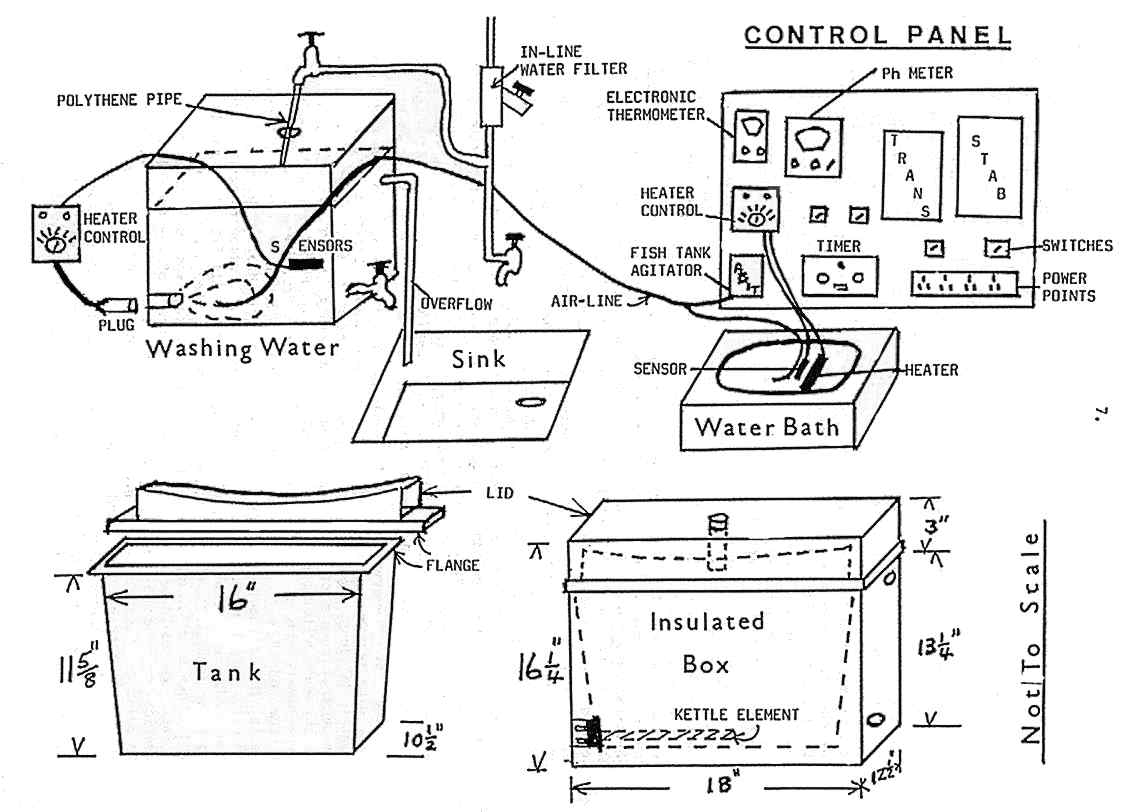
Back in 1980 I think, I had already built insulated tanks for washing water and a bath for the solutions and processing tank with thermostatic controlled heaters. Like most things,improvements were added at a later date. Enclosed drawings will assist in explaining how this was carried out. The top of the sketch shows how it is all weighed out. On the left us a control box for the washing water tank, next the insulated tank mounted on a shelf. The cold water supply is filtered before branching to the tank and sink. The sink is really a large plastic bowl let into the worktop with 1½" waste outlet fitted. To the right is a control panel on which is mounted Electronic Thermostat, pH meter, Transformer, Stabiliser, Heater/Control box for water bath, Fishtank type air agitator with branches for both tanks, Timer, several power points with switches for safelights, Enlarger etc. etc. All cables are out of sight to avoid cluttering the worktop. Heating for the tank is by means of a stainless steel 1Kw kettle element. A sensor wire runs from the box through a small hole in the lid in the lid down into one of the strengthening ridges about two inches up from the bottom of the tank away from the heating element, the air line is placed so that the outflow is under the element to circulate the warmed water. Heating of the darkroom is by two wall mounted tubular heaters which can be used one at a time or both together. The taps are of screw-on hose connector type making it easy to run pipes off for washing etc.
When constructing the washing tank I used a small water storage tank with seperate lid obtained from a builders merchants, the size is approximately 16" long, 10«" wide and 11 & 3/4" high, the bottom tapers in slightly, the lid is another couple of inches higher and fortunately has an extra large flange which, when building the outer box allows it to fit over the edge. The box is very simply made of hardboard with 2" x 1" batten framework around the top and bottom and 1" x 1" for the corners, assembly is by using glue and hardboard nails. The top section of the frame is made to allow fixing of the tank flange onto it, then the bottom frame to match, remembering to allow for the addition of the hardboard so that the overlap of the lid flange will fit. There should be room for insulation material between tank and box. The pieces of box were glued and pinned together checking at the time that the tank will slip in from the top, a test run should be made before final fixing screws of the none rusting type, mastic should be used under the edges to prevent the absorbtion of moisture in any case. The top of the tank overlaps about «" or so, so that the screws can be fixed quite easily. After holding the tank temporarily in place with some screws I drilled pilot holes with an eighth of an inch drill through the outer box and tank for the element, tap and 3/4" overflow which is about two inches from the top.
The reason for the overflow is that it cuts out the risk of overfilling and avoids the need to lift the lid to check the level. The overflow runs down to the corner of the sink. After the pilot drilling I remove the tank to complete the final cutting of the holes by means of various tools. At this stage I stuck cooking foil to the outside of the tank with adhesive. To fill the gap between the element and the hole through which the plug was to be inserted I cut a piece of 1«" waste pipe to bridge the gap preventing loss of insulation material which was then placed into position by turning the box upside down and filling level. A hardboard panel was then screwed to the bottom. To take all the weight of the several pieces of polystyrene foam onto the bottom of the tank making them level with the base panel, since I used insulation beads for fill it was no great problem to pack around the foam, in any case it could easily have been done if I`d used glass-fibre instead. A similar setup was done for the lid but with a piece of 3/4" plastic pipe let into the centre so that the water filling could be done via a section of polystyrene tube fixed to the tap above.
The water-bath for the solutions was of similar construction but size would depend on the size of the bowl, again the bowl outer was covered with cooking foil which I must emphasise has great bearing on the effectiveness of the whole insulation system. The bath heater is a 200 watt tube with suction feet which comes complete with control box and sensor, mine was obtained from Grove Industries, Grove House, Grove Road, Fareham, Hants. PO16 7TF. Telephone : 0329-232323. There would of course be other types available but the ones I bought I found very accurate and constant, with cutting well controlled, and with the insulation most effective. Temperatures are soon reached, I usually start off by pouring some hot water from the kettle into the bath so that it is about 1C above the setting, which is adjustable by dial, once set on the required temperature I find I can leave it until a different process requires a re-setting. Once the warm water is in the bath I place in the bottles and top up, the washing water would be filling at the same time and switched on, by the time I`ve had a meal, say half an hour, it would be ready to start processing. An added bonus is the fact that temperatures do not need to be checked throughout the operation once started.
Changes and Corrections
The starter list for the new formulae as given with the October CRCN omitted to mention the chemicals required should you wish to use Chemical Reversal. These are:- Proprionic acid =12ml per litre (100ml = £1.20), Stannous Chloride = 1.65gm per litre (25gm = £2.25) and p-Aminophenol = 0.5ml per litre (10ml= 35p, 25ml = 82p). Plus postage.
Postal charges are also slightly changed for the starter chemical pack. This is due to a stronger package being required to protect the numerous liquids and bottles enclosed and we feel sure members will appreciate this.
For packages up to 500gms (padded envelope) £1.35: up to 2Kg £2.75: up to 4Kg £3.40: up to 6Kg £3.90 and up to 10Kg £4.80. It is difficult to avoid these costs but if you intend coming along to the AGM at Didcot on Sunday 23rd April you can save on postage by ordering then collecting from Ron Croad at the venue.
In the formulae given by Rita & Major Pearle in the July 88 CRCN it was omitted to mention that both the reversal & stop baths should have read "Concentrate Solution - dilute 1 + 9 for use". The amount of Stannous Chloride in the reversal bath should be 1.65gms per litre.