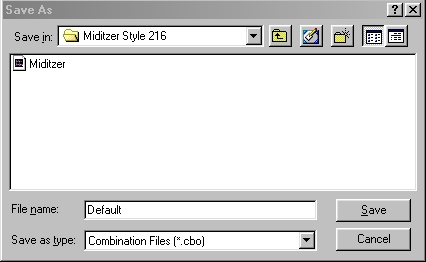
Before we get into
setting the combinations you should learn how to save and restore
combinations. On the Menu you will find items to Load and Save
the Combo File. These work as you would expect to save a file
with a .cbo extension which contains the entire combination action
setting. If you try to Load a Combo File Miditzer will warn you
if it thinks the combinations might not be saved and give you a chance
to save the existing combinations before overwriting them. Once
you Load a Combo File anything that was in the combination action is
lost forever so be sure to Save if you might want to go back to those
settings.


Setting combinations on the Miditzer is much easier than on a real
Wurlitzer. The Miditzer uses what is called a capture combination
action. Simply set the
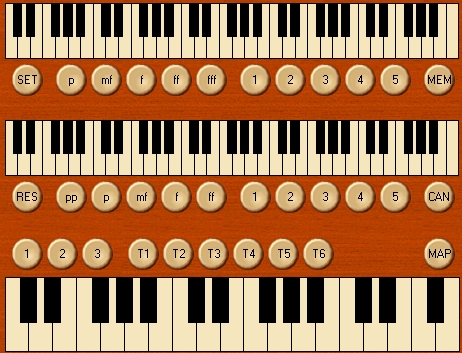
registration you want, press the SET button at the left under the Solo Manual (it will light up), and press the piston (button) that is to hold the combination (SET will go dark). Now if you press the
piston, the stored registration will be set.

Remember that the
pistons are divisional so when you set a piston that is under the Solo
manual, only the Solo stops will be captured. Accompaniment stops
pp, mf, and ff are configured so that they will
capture both the Accompaniment and the Pedal stops. The
Accompaniment pistons are actually independent of the Pedal pistons 1,
2, and 3. I just set them to be the same to give the effect of
the Accompaniment pistons triggering the Pedal combinations. Take
a moment to digest what you've learned so far because we are now about
to explore just how powerful the combination action really is.
The Miditzer has a combination action that rivals what is found in the
most up-to-date computer control systems for pipe organs.
The pistons are not really divisional. They just can be
configured to look that way. But you can set them to be
divisional, general, or anything in-between. This is all
controlled by Maps. Every piston has both a Setting and a
Map. The Setting, which we have learned how to do, controls which
stops are turned on and which are turned off by a piston. The Map
controls which stops are affected by the piston. If a stop tab is
Mapped On, the setting can turn the tab on or off. If the stop tab
is Mapped Off, then it is not affected by the piston; the stop will just
be left however it is. You can see and set the maps by putting
the console into Map mode by pressing the MAP piston.
When the combination action is in Map mode, pressing a piston will turn
on the pistons according to the Map. If you try a Solo piston you
will see that all the Solo stops and Trems are On and everything else
is off. You will also find that all the Solo pistons are mapped
the same way. Look at the Maps for the Accompaniment and Pedal
pistons. Notice how Accompaniment
stops pp, mf, and ff are configured to control both
Accompaniment and Pedal stops.
You can configure the Maps the same way you configure the
Settings. While in Map mode just turn on all the stops you want
to be affected. Then press SET and then the piston that you want
to map. Try changing the Map so that the lettered Solo pistons
don't affect the couplers. While in Map mode press p to show the existing Map.
Turn off the couplers. Press SET and then press p. Repeat the SET and piston
sequence for the remaining four lettered pistons. Finally press
MAP to exit Map mode. Now press a lettered piston and notice that
the couplers are not changed.
Sometimes pistons are used as "Reversibles". A Reversible toggles
one or more stops, if the stop is on it is turned off and vice
versa. You can create a reversible by clearing the Map for a
piston (SET a Map with all stops off). Now any stop that you Set
on the piston will be a reversible. Clear the Map for
Accompaniment 5. Then SET the Snare Drum on Acc 5. When you
press Acc 5 the Snare Drum will be turned On or Off. Now SET both
the Snare Drum and the Tamborine on Acc 5. Notice that if both
stop start out in the same state, then they turn On and Off
together. But if they start with one On and the other Off, then
one will always be On and the other Off. That can be useful but
you can see that putting a lot of stops on a Reversible can get tricky
to use unless the stops are closely related. You might find a use
for having most or all of the trems on a reversible for example.
What really makes the combination action of the Miditzer powerful is
that it has 100 levels of memory. The indicator at the lower
right shows what memory level is active from 00 to 99. Each
memory level holds a complete set of piston Settings and Maps.
You could set up your pistons with all your registration changes for
one song in a memory level and use a different memory level for each
song in your program. I have given you this extra measure of
power in the combination action so that a lack of real stop tabs should
be of little hinderance to your performances.
You select a Memory Level by pressing MEM which will stay lit and then pressing two of the pistons under either the Solo or Accompaniment manuals. The two rows of pistons are the same for the purposes of selecting memory levels. The pistons are treated as though they were numbered from 0 to 9, left to right. You would Press MEM, 1, and 5 to select Memory Level 59 as shown above. After you press two pistons the MEM piston will go dark. If you go exploring you might think you've discovered that you can be clever and just click the memory indicator with the mouse to select a memory level; the indicator changes but not the memory level so don't try to be clever. Do not use memory 99 as that is for the crescendo pedal settings.
Once you start filling up memory levels you really should save all that hard work. If you come up with good registrations let others know about it.